 WHATBOT PLUS is a software designed for those who want to automate the sending of Whatsapp messages directly from their PC or MAC in a simple and effective way. It is a BIDIRECTIONAL software because it has 2 main functions:
- Send Whatsapp Messages
- Automatically reply to users
WhatBot is an ideal software for all those small / medium-sized companies, businesses or freelancers who use Whatsapp to communicate with their customers. Thanks to WhatBot you can send newsletter campaigns via Whatsapp and also set up automatic replies. It is also possible to interact with users thanks to commands that once configured allow the customer to obtain various information, receive offers and promotions, and much more.
WhatBot Auto Responder Features:
✔ Automatically responds to your customers according to precise rules and commands that can be configured very easily
✔ Automatically send welcome message with dynamic menus and commands (also nested)
✔ Set commands to automate the sending of offers or to give other information to your customers
✔ Send both text responses and multimedia messages with text, images, links and emojis
✔ Create dynamic menus in a simple and intuitive way
✔ Tracks all messages received from customers and also allows you to manually reply to customers
WhatBot Bulk Sender Features:
✔ Send Whatsapp messages directly from your PC (even to contacts not saved in the address book)
✔ Import contacts from Excel, CSV or TXT files
✔ Import contacts or groups directly from Whatsapp
✔ Advanced features: whatsapp number filter, scheduling for sending messages, random delay between messages (to reduce the risk of bans)
✔ Ability to customize the message to be sent with variables, random tags, spintax.
To understand how WHATBOT PLUS works, install the free DEMO version for Windows or Mac from the following links:


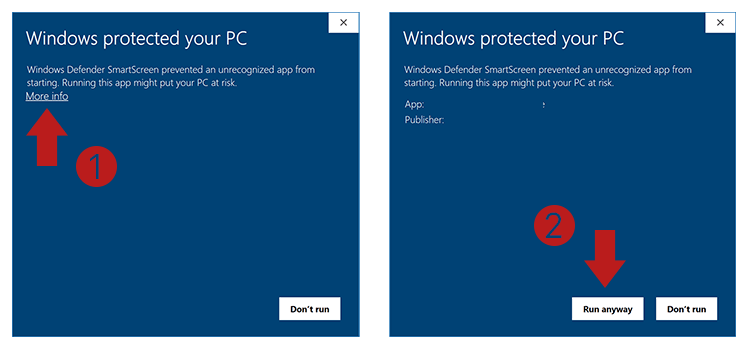
On Windows if before installation you see the SmartScreen window, click on More Info –> Run AnyWay button to go on:

On Mac, to install and open the program you need to double click on the dmg file and move WhatBot into Application folder. Then do right click on WhatBot icon (in Application folder) and select Open.
NOTE 1: The DEMO version of WhatBot allows you to understand how the system works. In this version you can set replies of up to 20 characters and you can only import contacts manually.
NOTE 2: This tool allows you to communicate with recipients that expect receive your messages (Eg. Cliients , students , patients , etc..), and it’s not a spam tool, so we are not responsible if you got banned. WhatBot is not affiliated or a part of WhatsApp™.
[GUIDE] HOW TO USE WhatBot PLUS?
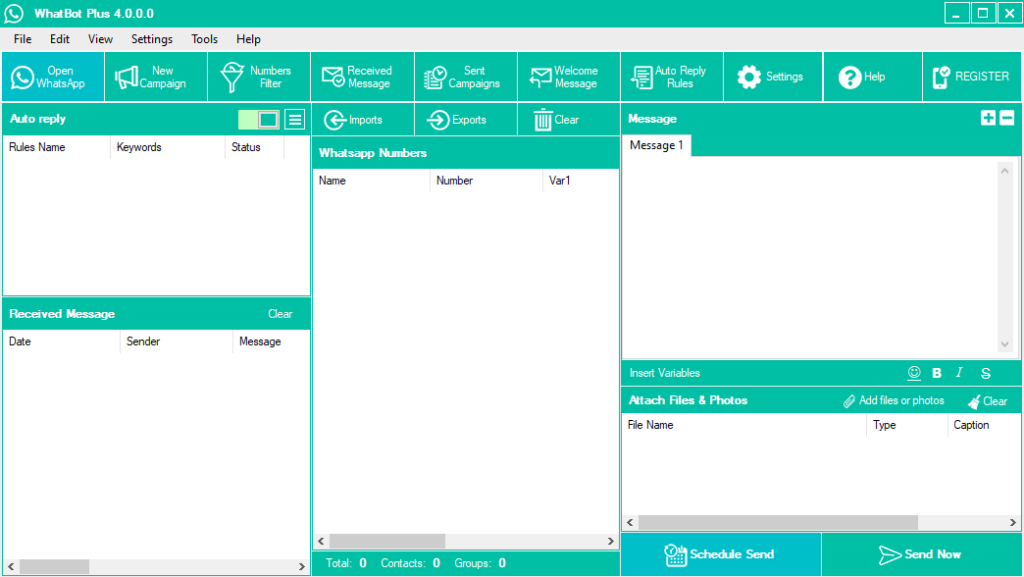
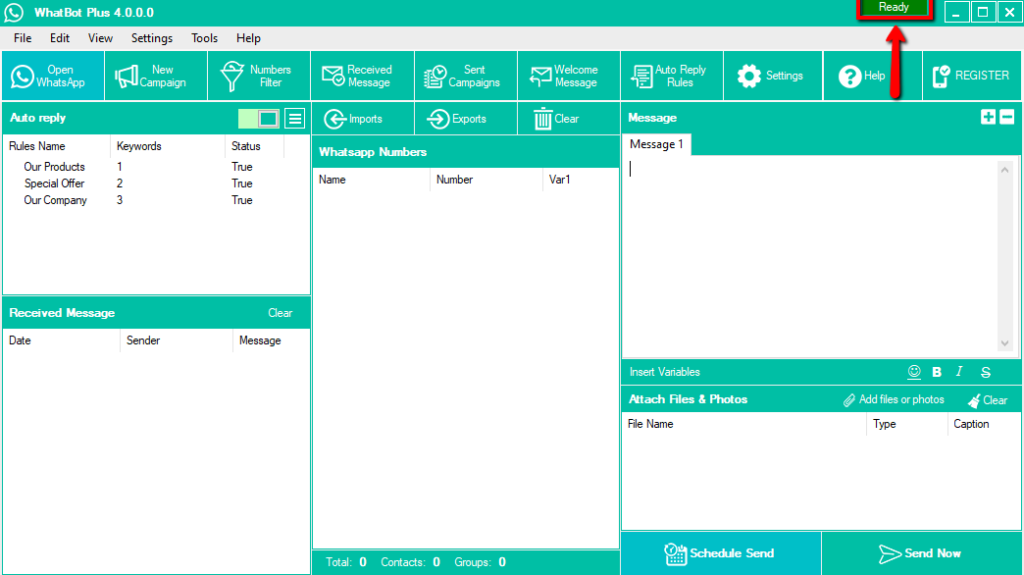
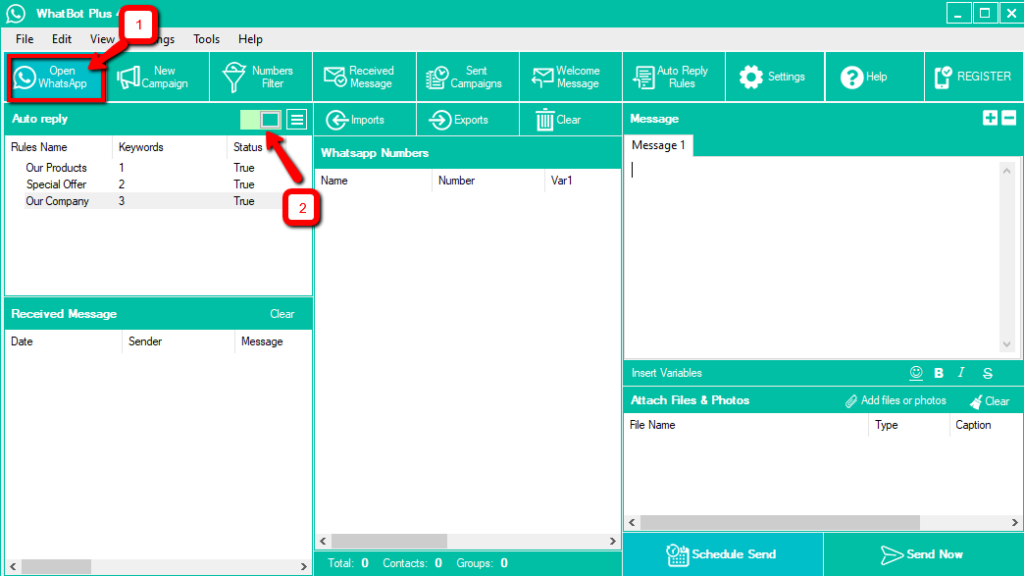
Download WhatBot Plus on your Windows PC. Once you open the program you will see this home screen.

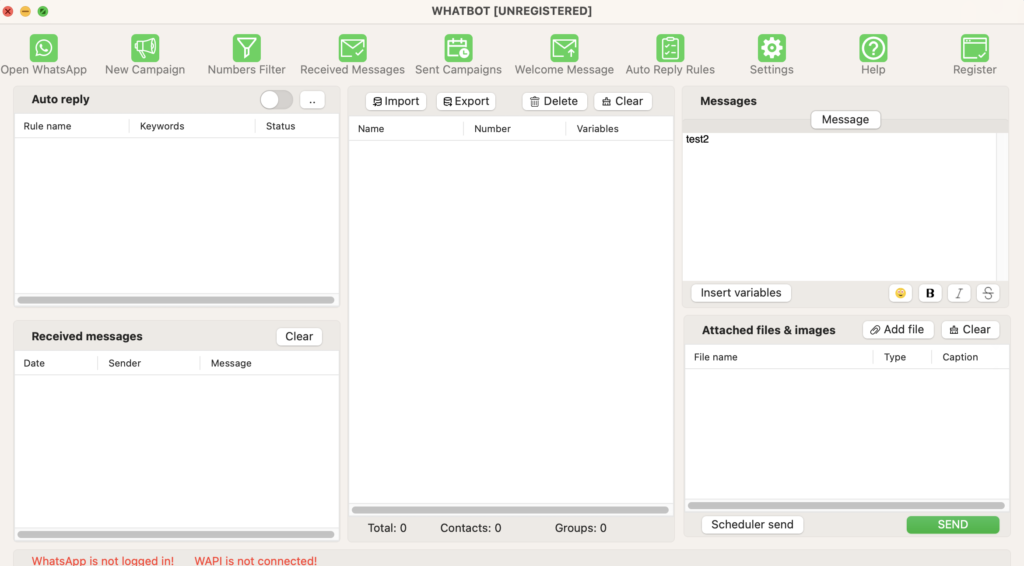
On macOS the main interface is similar to the Windows version (they have the same main features):

GUIDE INDEX
WHATSAPP BULK SENDER FEATURE
WHATSAPP AUTO RESPONDER FEATURE
ADVANCED FEATURES
WHATSAPP BULK SENDER FEATURE
With WhatBot Plus it is also possible to do Whatsapp Marketing and send multiple Whatsapp messages to all your contacts, even those NOT saved in the address book of your mobile phone, directly from your PC.
Using WhatBot Plus to send whatsapp messages (both textual and with attachments) is very simple.
Step 1. Open Whatsapp in WhatBot Plus
The first thing to do is activate the WhatBot Plus service by clicking on the OPEN WHATSAPP button at the top left. The whatsapp web window will open with a QR code. If you are using the Mac version you will be asked to install FireFox to make the app work correctly!


Scan the QR code by opening WhatsApp on your mobile phone and from the settings go in LINKED DEVICES and click on LINK DEVICE. Move your mobile phone closer to the computer screen to scan the QR code.
Once this is done, wait for the green READY to appear at the top right of the program. Now the program is ready to work.

On the Mac version you will see the the string “WAPI Connected” at the bottom left.
Step 2. Import your contacts
To import the contacts you want to send messages to is very simple. Click on the IMPORTS button and then choose how to import contacts
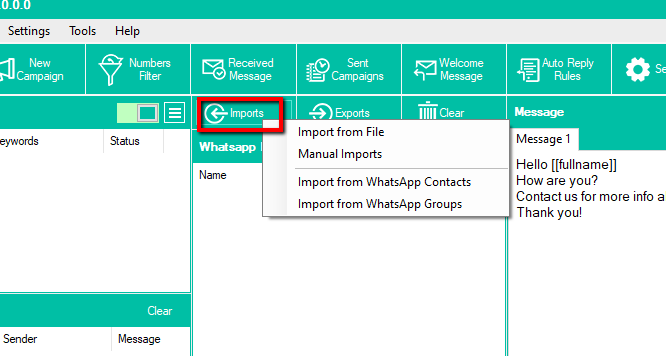

You can import contacts in 4 ways:
- Import from Excel, CSV or TXT files
- Manually (by writing the numbers in the relevant box)
- Import all your Whatsapp contacts
- Import all the contacts of the groups you are part of
NB: All phone numbers must have the country prefix
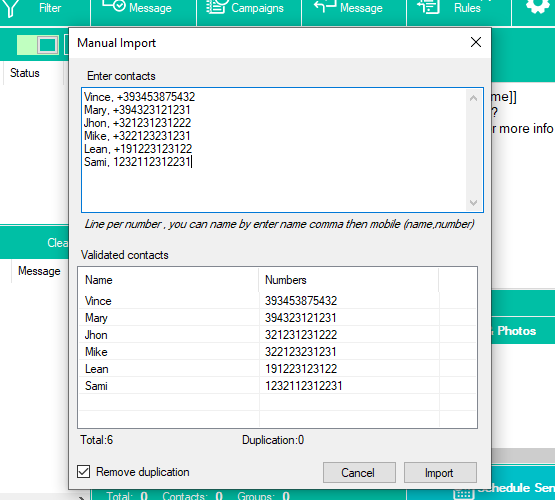
NB: With the DEMO version of WhatBot you can only import contacts manually and you can enter a maximum of 5 numbers at a time.
In the case of manual import, you can only enter phone numbers (with international prefix) or name and number separated by a comma. The advantage of entering the name is that you can send personalized messages by automatically inserting the name of that contact in the message itself.

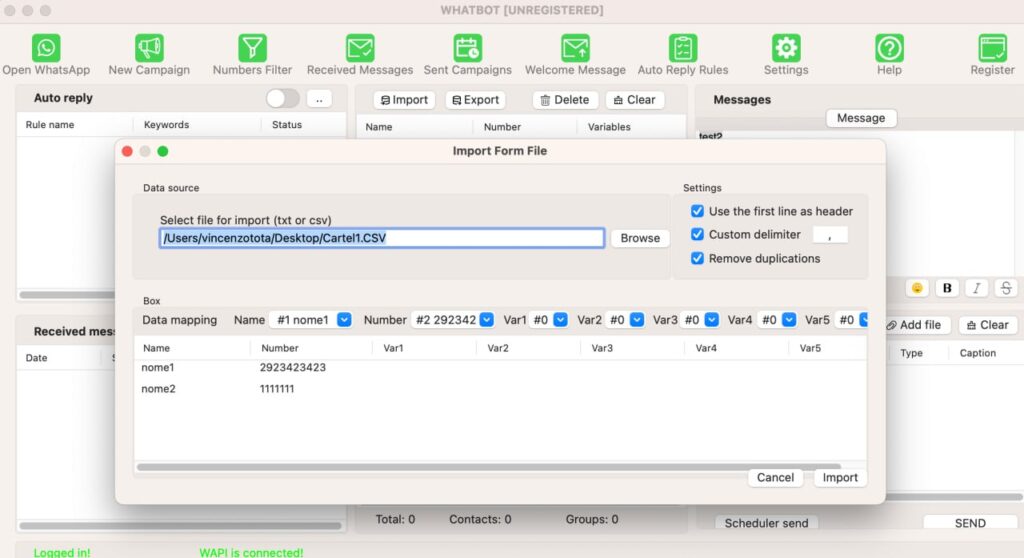
If you choose to import contacts from files, the following window will open where you can view all the data to be loaded
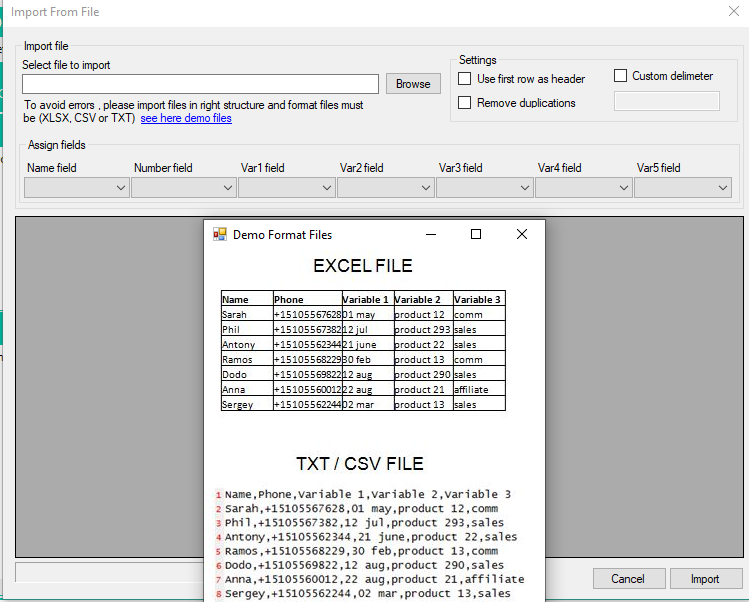

In addition to the name and number of the contact, it is also possible to add variables which can then be automatically added to the message to be sent.
NOTE: If you are trying to import an XLS file and you get the error “Microsoft.ACE.OLEDB.12.0 provider is not registered on the local machine” you have to try download and install this Microsoft Office component in your PC: https://download77.net/
On the Mac version it is possible to import files only in CSV or TXT format in which you can have the list of names, telephone numbers and any other variables all separated by commas.

Step 3. Send the message
After importing the contacts you have to write the message in the appropriate box (on the right)
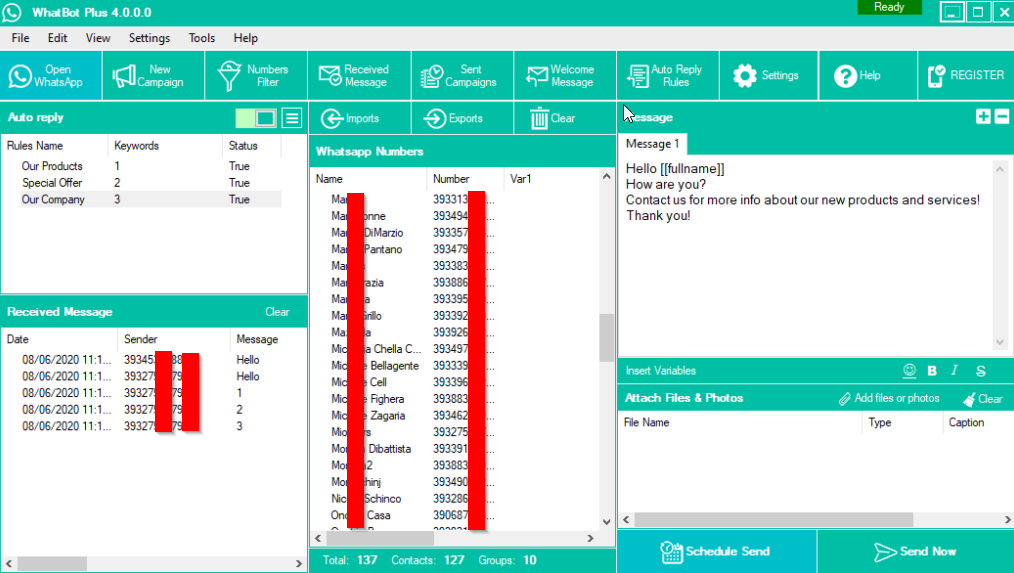

In the message you can insert the variables in order to create personalized messages for each user.
At the bottom right of the Attach Files & Photos section you can also attach documents, photos or videos.
Finally proceed to send by clicking on the SEND NOW button
There are two ways of sending:
BLIND MODE: sends the message to all the contacts you have entered, even to those not saved in your address book.
SAVED CONTATS MODE: sends the message only to those contacts with whom you have had a conversation in the past.
After choosing how to send the messages click on OK and the sending will take place immediately.
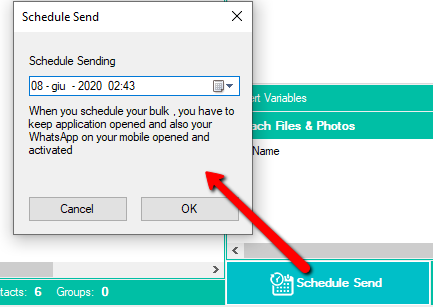
If you want to schedule the sending to another date click on SCHEDULE SEND and choose the sending date and time.

WHATSAPP AUTO RESPONDER FEATURE
Here’s how to use WhatBot Plus to automatically respond to your customers and provide all the information you want by configuring dynamic menus with related commands.
NOTE: To try this feature you need to get two devices with two different WhatsApp accounts:
A first device with an account to be used as a BOT (i.e. the one that will automatically send replies) – for example, you could use your company cell phone or secondary cell phone.
A second device with another Whatsapp account (e.g. your personal account). When you send a message from this mobile phone to the first device (BOT) you will receive automatic replies on Whatsapp.
STEP 1. Set up welcome message and automatic replies
Click at the top on the WELCOME MESSAGE button and a window will open where you can enter the welcome message that customers will automatically receive when they contact you via Whatsapp.
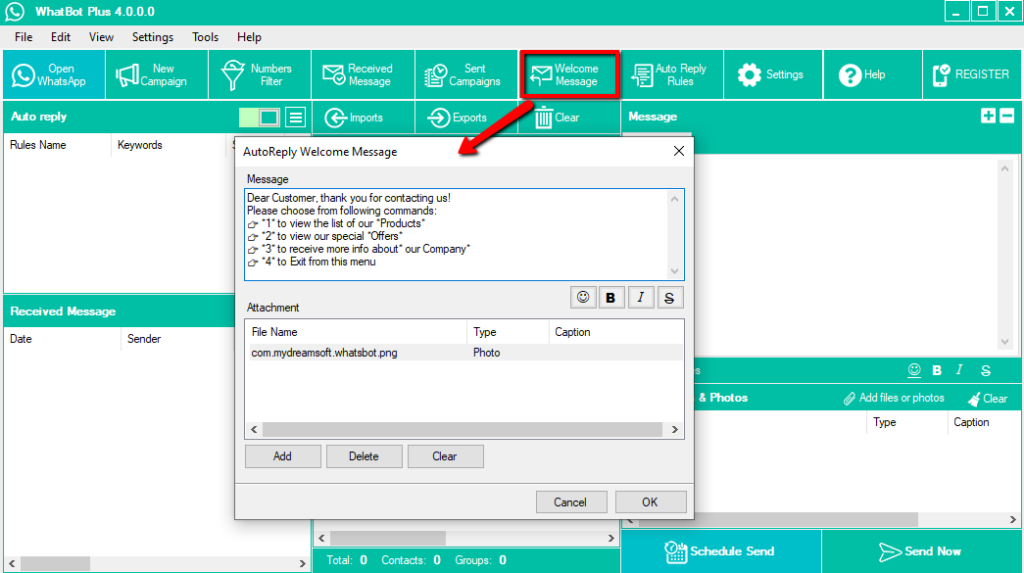

In the welcome message a list of commands is usually inserted to allow the user to receive the information he wants. For example, you can write a welcome message like this:
Dear Customer, thank you for contacting us!
Please choose from following commands:
👉 Enter *1* to view the list of our *Products*
👉 Enter *2* to view our special *Offers*
👉 Enter *3* to receive more info about* our Company*
In addition to the message you can also add an attachment (e.g. a photo)
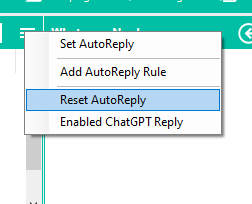
The welcome message is sent only the first time a contact writes to your number. If you want your contacts to receive the welcome message again, go to the three-dot menu and click on ‘Reset AutoReply‘ or ‘Reset Welcome Users.’ This will ensure that your contact receives the welcome message again if they reach out to you

With the demo version you can enter a maximum of 20 characters, so you can only enter a few words for testing the program.
After configuring the welcome message, you can proceed with the creation of the automatic replies associated with each command. Click above on AUTO REPLY RULES to start creating the answer (associated for example with the “1” command)
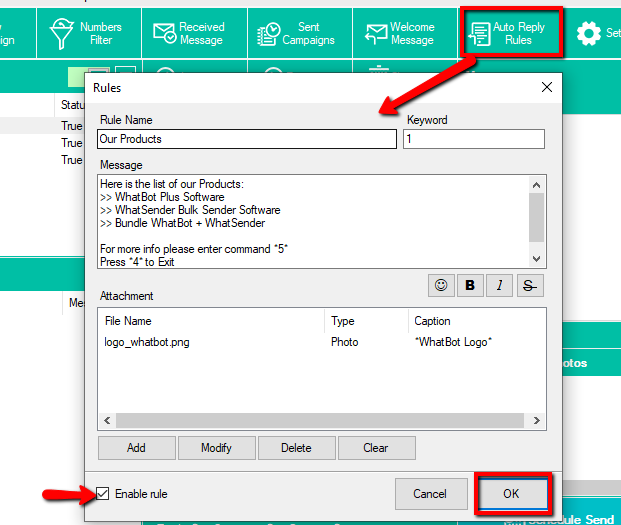

In the Rule Name field you have to enter the title of the rule
In the Keyword field enter the command that the user should type to receive this response
In the Message field enter the message to be shown. In this message you could also add the reference to other nested commands to send further detailed answers to the user.
In the Attachment field you can add an attachment (e.g. photo) to be sent together with the reply.
Finally select the ENABLE RULE field and press OK to save the first automatic reply.
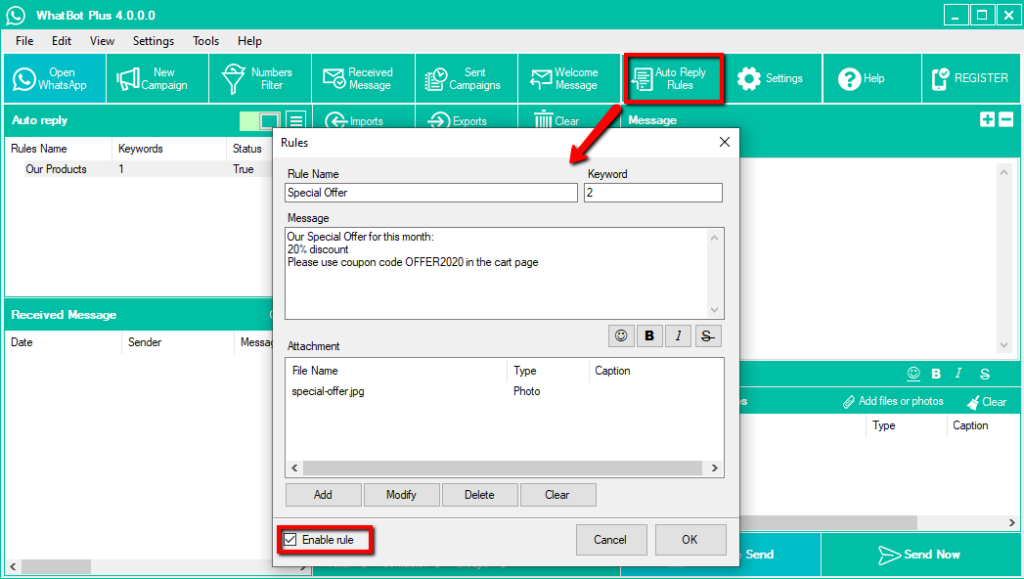
Do the same for the second automatic answer (eg Special offers):

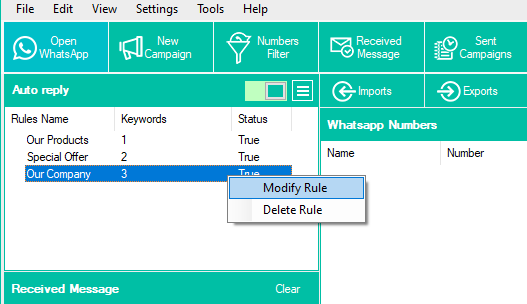
Enter all the automatic replies you want. These will appear on the left of the program and by clicking with the right mouse button you can also edit or delete them.

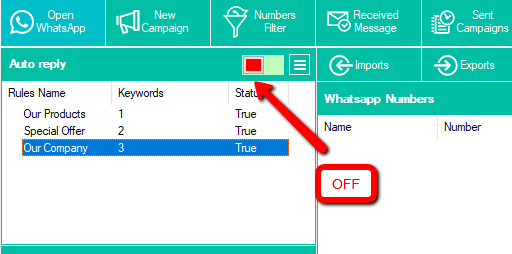
At any time you can activate or deactivate the sending of these automatic replies by clicking on the cursor at the top. By positioning the switch to the right (red), automatic replies will NO longer be sent.

STEP 2. Open Whatsapp and enable Whatbot Plus
To activate the “auto reponder” service, click on the OPEN WHATSAPP button at the top right and make sure that the “Auto Reply” cursor is set to green and not red.

After clicking on OPEN WHATSAPP you must take the mobile phone to be used as a BOT, open Whatsapp on that mobile phone and from the settings click on Whatsapp Web. Then bring the mobile phone close to the computer screen to scan the QR code.
After the scan, wait a few seconds until the green READY message appears in the upper right of the program as shown in the following figure:
Now everything is ready.
STEP 3. Check the Auto Responder operation
To test the operation, send a Whatsapp message to the BOT mobile phone from another device. After a first message you will receive a reply with the “Welcome Message“. Immediately after you can enter the various commands (eg “1” or “2”) to receive the relative configured responses.
Here is an example of how the end customer will see both the welcome message and all configured automatic replies:

All received messages and telephone numbers of customers who have sent a message to the BOT will be viewable on the RECEIVED MESSAGE screen.
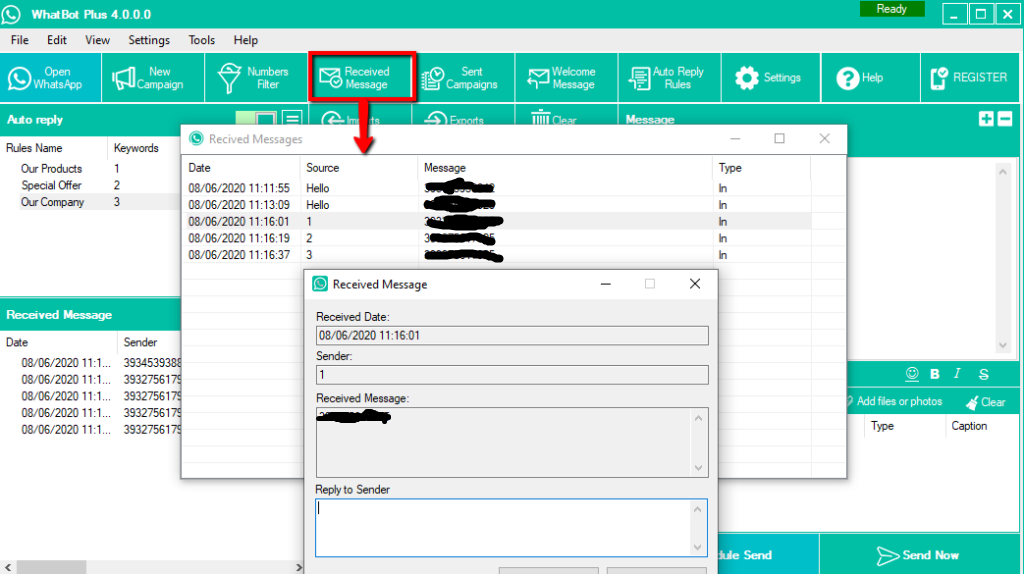

From this window, by double clicking on a row you can also manually reply to a single customer. You can also export all data to save the contact’s details (numbers, messages, etc.)
As you can see, thanks to WHATBOT PLUS it is possible to create an INTERACTIVE communication with the customer / user and it is possible to send a series of different information (all automatically)
Download the DEMO version of WhatBot now and try it. It’s simpler than it sounds and with the PRO version (which costs only $39) you can remove all types of limitations and create dynamic and personalized menus, write messages of unlimited length with links, emojis and images, and much more!
ADVANCED FEATURES
WHATSAPP NUMBER FILTER: it is a very useful function because it allows you to know which numbers are “whatsapp numbers” and which not. Thanks to the filter it is possible to clean up a list by removing all invalid contacts that could cause problems during sending and even the block of the account.
To use this function you must first click on OPEN WHATSAPP and scan the QR code. Once the green READY writing appears at the top right of the program, click on NUMBER FILTER and a window will open where you can import the numbers to be verified.
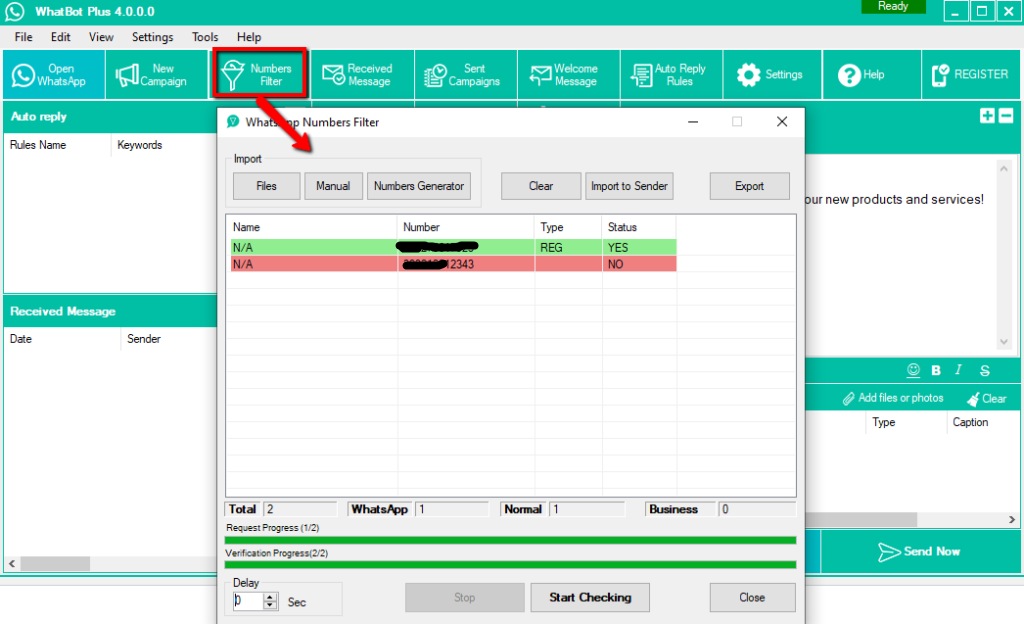

You can import the numbers either from excel, csv, txt files or enter them manually. We suggest to do not filter more than 1000 numbers per time to avoid ban issues!
To start the check, click on START CHECKING at the bottom. Valid numbers will be highlighted in green. Invalid numbers will be highlighted in red (i.e. not associated with any Whatsapp account).
PS: Add also a delay of 2 or 3 seconds to reduce risk of ban.
After verification, you can export the list of only valid numbers or click on Import to Sender to put them in the sending list of the program.
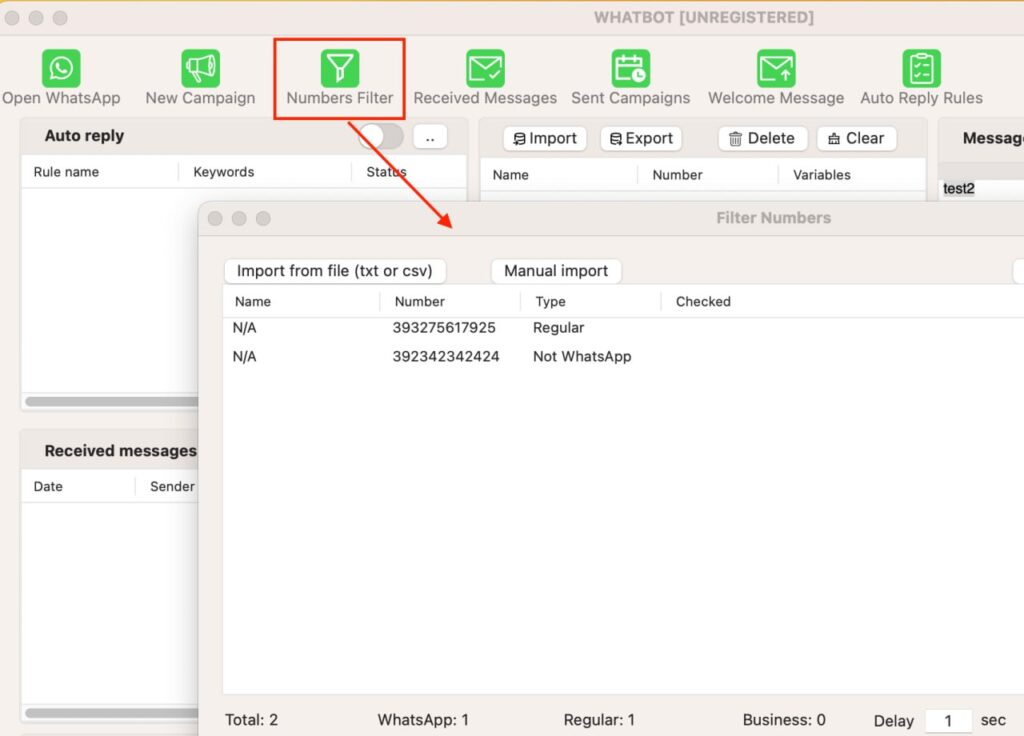
There is also a similar WhatsApp number filter function on the Mac version of WhatBot:

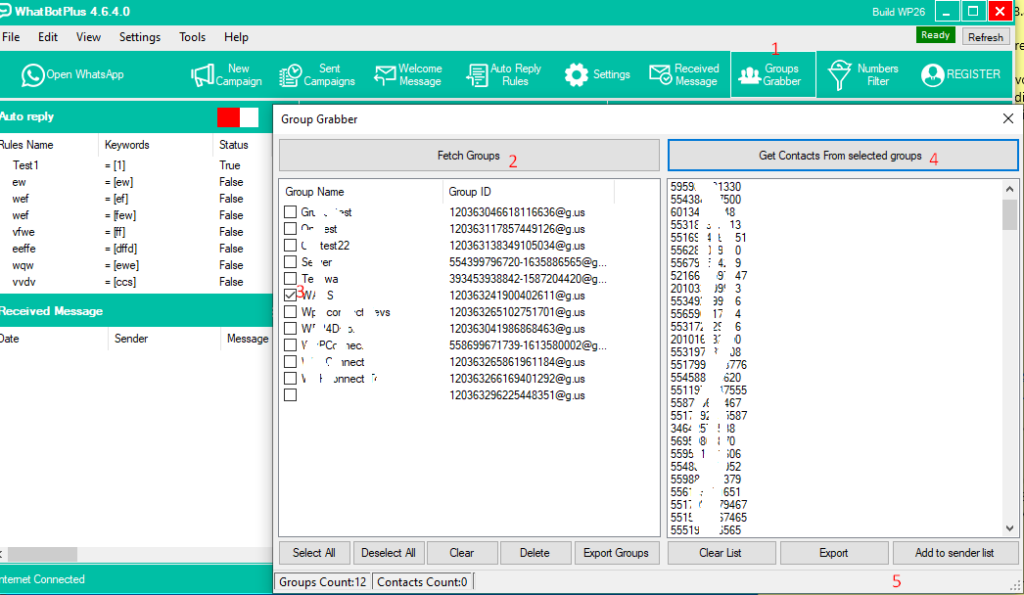
GROUP GRABBER FUNCTIONALITY: A useful feature for exporting contacts (phone numbers) from a WhatsApp group. Below are the steps to use the function on Windows:
- Click on the Group Grabber icon
- Click on Fetch Groups
- Select the desired group
- Click on GET CONTACTS FROM SELECTED GROUPS
- Click on Export to export the list, or on ADD TO SENDER LIST to import the numbers into the program and send a message

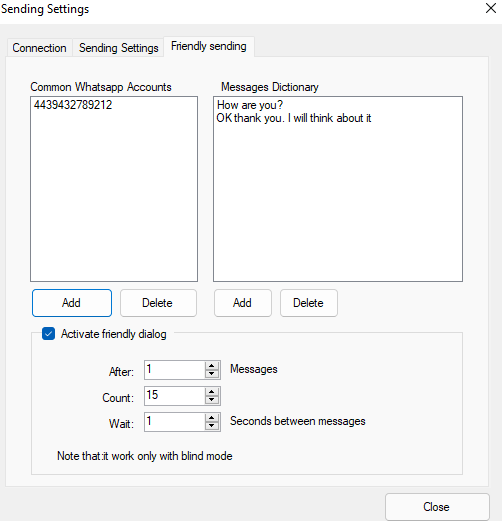
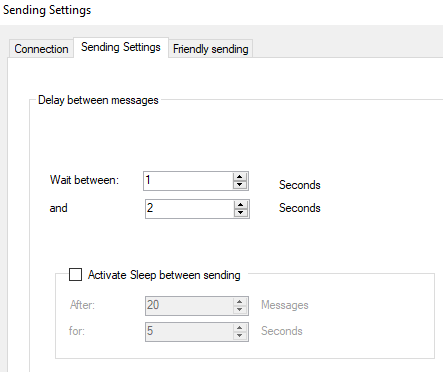
SETTINGS: By clicking on SETTINGS you will access the program settings where you can activate useful functions to reduce the risk of bans (especially if you send to contacts with whom you have never had conversations)
In the SENDING SETTING section you can set a random delay between messages

In the FRIENDLY SENDING section you can instead enter your other Whatsapp numbers and set phrases that will be randomly sent to those numbers (during the sending of a campaign) in order to increase the reputation of the sending itself.